December 13, 2024
Table of Contents
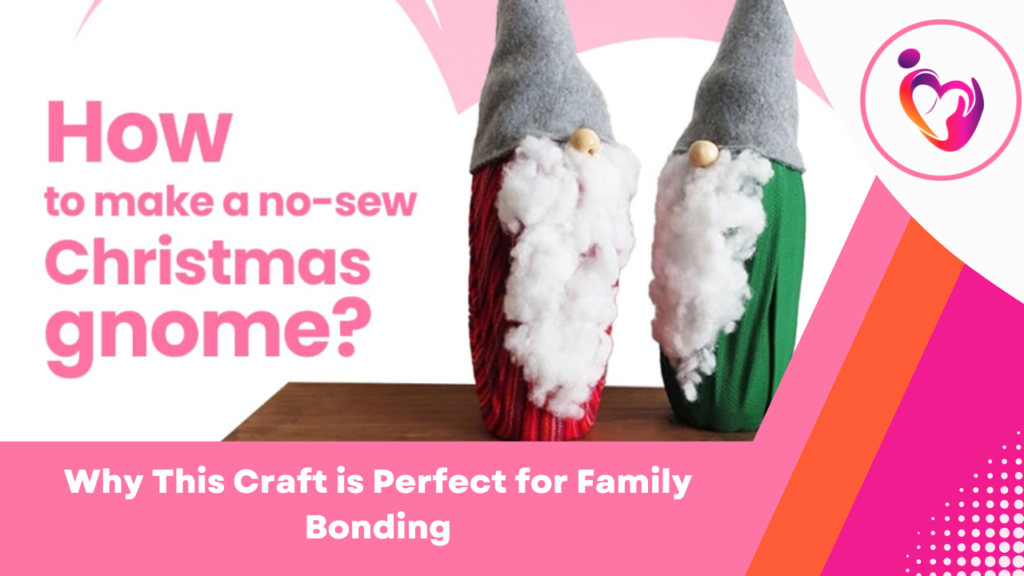
The holiday season is all about fun, family, and festive decorations. If you’re looking for an easy and creative way to brighten up your home, this DIY Christmas gnome craft is perfect for you! Whether you’re crafting solo or enjoying some family bonding time, this no-sew project is simple to make and adds a charming touch to any holiday decor. Plus, it’s budget-friendly! So grab your crafting supplies and let’s get started on creating a cute Christmas gnome to spread some holiday cheer with this DIY Christmas Craft Tutorial!
What You’ll Need

Before we dive in, let’s gather all the materials you’ll need for this fun Christmas craft:
- 32oz plastic bottle – this will be the body of your gnome
- Scrap fabric – thin fabric works best to cover the bottle smoothly
- Felt fabric – for the gnome’s hat
- Cushion filling – to make a fluffy beard
- Wooden bead – this will be your gnome’s nose
- Scissors – for cutting fabric and felt
- Hot glue gun – to hold everything together
Once you have everything ready, you’re all set to create your adorable no-sew Christmas gnome with this DIY Christmas Craft Tutorial!
Step 1: Create the Gnome’s Body
Start by cutting a piece of fabric big enough to cover your plastic bottle. The fabric should be large enough to wrap around the entire bottle, and thinner fabric will give you a smoother finish.
Now, take the fabric and wrap it around the bottle like you’re wrapping a gift. Secure the fabric in place by tying a piece of rope around the neck of the bottle. A knot will help keep the fabric tight and hold the gnome’s body together.
For extra stability, fill the bottle with some water or sand. The weight will help your gnome stand upright and keep it from tipping over. If you want your gnome to be more durable, you can use a heavier bottle. The best part? You can reuse the bottle after the holiday season!
Step 2: Craft the Gnome’s Hat
Now, let’s make the gnome’s hat! This is where the fun begins. Grab your felt fabric and cut out a triangle. The height of the triangle should be about 9 inches, and the base should be 11 inches. Don’t worry about making it perfect – you can round the edges for a more playful look.
Once you’ve got the triangle shape, apply a line of hot glue along one of the edges. Fold the fabric into a cone shape, bringing the edges together. Glue the opposite edges to form the hat. You should have a cute, pointy hat ready to go!
Continue with this DIY Christmas Craft Tutorial to create the rest of your gnome, making it even more festive and fun!
Step 3: Add the Gnome’s Beard
Every gnome needs a fluffy beard, right? To create this, take your cushion filling and glue it onto the front of the bottle. Spread the cushion filling generously to make a long and bushy beard that gives your gnome some character. The more cushion you use, the fuller the beard will be, so have fun with it!
If you don’t have cushion filling, you can also use cotton balls or even yarn for a different look. Just be creative!
Step 4: Put the Gnome Together
Now it’s time to assemble your gnome. Take the pointy hat and place it on top of the bottle. Secure it in place with a few dots of hot glue to make sure it stays in position.
Finally, take your wooden bead and glue it to the front of the gnome’s beard. This will serve as the gnome’s nose. Make sure it’s centered and gives your gnome a cute and charming face!
And There You Have It!
Your no-sew Christmas gnome is now complete! You’ve created a fun and festive decoration that’s sure to bring a lot of joy to your home this holiday season. Whether you place it on your mantel, a shelf, or even use it as a table centerpiece, your new gnome will add the perfect touch of charm to your Christmas decor.
Show Off Your Gnome Craft!

Don’t forget to share your gnome with us! We love seeing your creativity come to life. Whether you’re crafting solo or with friends and family, your unique Christmas gnome is sure to bring holiday cheer to everyone who sees it. Snap a picture and share it using the hashtags below so we can celebrate your crafting success together.
And remember, if you followed along with our DIY Christmas Craft Tutorial, be sure to tag it so we can see your wonderful creations!
Use These Hashtags to Share Your Gnome:
#PrimoCares #ScatterTheLove #DIYHolidayDecor #CraftyChristmas #HolidayVibes
Crafting your decorations is not only a great way to save money, but it’s also a fun and meaningful way to personalize your home for the holidays. And the best part? You can keep making more gnomes in different colors, fabrics, and sizes to create your own little gnome family!
Why This Craft is Perfect for Family Bonding
This DIY project is more than just a simple craft – it’s a great activity to do with loved ones. Gather your family and friends, and make a bunch of gnomes to decorate your home together. You can even make it a holiday tradition, creating new gnomes every year to add to your collection. It’s a fun, hands-on way to spend quality time and create lasting memories while also getting into the holiday spirit!
Also, if you’re looking for another way to bond with family, consider checking out our PrimoGaming88 partnership, where you can enjoy family-friendly games together, adding another layer of fun to your holiday season.
So, what are you waiting for? Let your creativity flow and spread the holiday cheer with your very own DIY Christmas Craft Tutorial. Happy crafting and Merry Christmas!
Frequently Asked Questions (FAQs) About DIY Christmas Gnome Craft
1. Can I personalize my gnome using different fabrics?
Definitely! One of the best parts of this DIY Christmas Craft Tutorial is how customizable it is. You can experiment with different fabrics, colors, and patterns for the body and hat to make your gnome truly unique and match your holiday decor.
2. What materials do I need for this DIY Christmas Craft Tutorial?
To make your no-sew Christmas gnome, you’ll need a 32oz plastic bottle, scrap fabric, felt fabric for the hat, cushion filling or cotton balls for the beard, a wooden bead for the nose, scissors, and a hot glue gun. These materials are easy to find, and once you have them, you’re ready to start your DIY Christmas Craft Tutorial!
3. Can I use other materials for the gnome’s beard?
Yes, absolutely! While cushion filling is ideal for a fluffy beard, you can also use cotton balls or yarn for a different look. This DIY Christmas Craft Tutorial encourages creativity, so feel free to experiment with what you have on hand!
4. How long will it take to complete this DIY Christmas Craft Tutorial?
The no-sew Christmas gnome should take about 30 minutes to an hour to make. It’s a simple and fun DIY Christmas Craft Tutorial that doesn’t require too much time but delivers great results to add festive cheer to your home!
5. Can this DIY Christmas Craft Tutorial be done with kids?
Yes, this craft is a great activity to do with kids! Just be sure to supervise when using the hot glue gun. It’s a perfect family-friendly DIY Christmas Craft Tutorial to create adorable gnomes together and enjoy quality time.
Tuklasin ang Higit Pa Tungkol sa Primo
- The True Spirit of Christmas: Giving, Caring, and Spreading Hope
- Ang Tunay na Diwa ng Pasko: Ipalaganap ang Kabutihan Ngayong Kapaskuhan
- Sama-sama Nating Gawing Mas Maliwanag ang 2025!
- Welcome 2025: A Year of Health, Happiness, and Hope with PrimoCares
- PrimoCares 2024: Isang Taon ng Pag-asa, Pagmamalasakit, at Tagumpay


